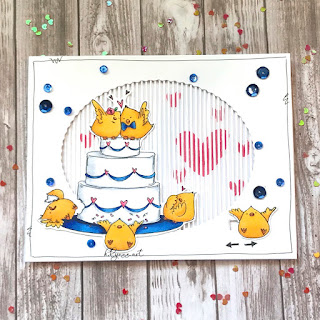
animated wedding card...
Hello my fabulous friends,
and happy June!
It's that time of year again... The time of year when I get that one song from My Fair Lady stuck in my head...
🎶"I'm getting married in the morning... ding dong the bells are going to chime!"🎶
No, I'm not getting married, but that seems to be the song that runs through my head when I'm working on wedding cards.. LOL!
Paper: Neenah Classic Crest Solar White
Ink: Altenew Permanent Black, Coral Berry; Copic multiliner
Coloring: Copics
Cake- C0, C3
Blues- B24, B26, B29, B99
Yellows- Y15, Y17, YR23
Orange-YR15, YR68
Pinks- RV25, R43
Greens- G02, G07
Dies: LDRS Creative Woodland Foliage Frame; Motion Crafts Animation Grid; Paper Crafts Multi-bow
Other: sequins
This card was made by special request... The wedding colors are yellow and royal blue...And since I hear the bride is an animal lover, this ADORABLE Stamping Bella wedding cake seemed absolutely PERFECT!
However, I wanted to give it a little something extra... So I added a custom animated background!
I wanted to use the smaller oval from LDRS Creative's new Woodland Foliage Frames because it would give me a large window space behind large cake image.
If you want to do this the easy way, you can use the printed animation grids... they are large enough to cover the opening... However, I didn't want bold black lines on the wedding card.. So I used the Animation Grid die to create my own grid out of white cardstock.
Now this die isn't big enough to cut my grid in one pass... It actually took 4 cuts to cover the whole space... Just be sure to overlap slightly so you can line up the part you have already cut, in part of the die so you keep everything straight and even.
Because I was going to have my stamped images move instead of the grid, I could then glue my grid to the back of my die cut front panel.
I wanted to fill my background with hearts of various sizes... So I chose to use stamps from 2 different animation stamp sets... As long as your animated lines are all going the same direction, you can mix and match the Motion Craft sets to your heart's content!
The two main tricks to getting good animation are...
1) Your stamp and grid must be straight... they have to line up right for this to work. I find using a MISTI or Stamp Platform are the easiest ways to make sure everything is perfectly lined up. The grid on the lids allows you to line your stamps up perfectly!
2) Use bold or dark colors to stamp your image... Or at least, have lots of contrast between your background color and your ink color... That contrast makes the animation pop more.
Again, I use a MISTI or Stamp Platform for this so I can double stamp my images... this ensures crisp dark images.
To finish it off, I did some partial stamping to stamp just this chick (without the cake) and turned him into my the slider!
(if you want to learn how I do partial stamping, check out my tutorial HERE)
I love the added fun that animation brings to cards!
Have you tried animating any cards?
Oh... and on a side note.... Today starts the 10th anniversary of the 30 day Coloring Challenge with the incredible Kathy from TheDailyMarker.com!
🎉🎉🎉
I LOVE doing these! They are so much fun, and it is such a wonderful and supportive community!
Please consider participating! It doesn't matter where you are in your coloring journey! Just come have fun with us! All you have to do is color each day... then use the hashtag #thedailymarker30day when you share! Click HERE for more info.
(get your kids to join in too using the hashtag #thedailymarker30daykids)
I'll be sharing my daily coloring on Instagram... You can find me HERE
See you soon!
~Kassi
For more inspiration, follow me on:
*Affiliate links used when possible. This doesn’t affect the price you pay, it simply allows me to continue bringing you better content. :)


I love your animated card! I also love your explanation on how you did it. I would love to give this a go myself :)
ReplyDelete