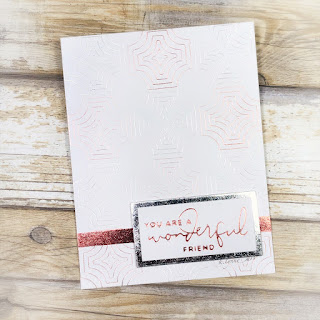
foiled background using a die...
Hello my fabulous friends!
Note: Products were provided by the company, however my opinions remain my own. Affiliate links have been used. This doesn't affect the price you pay, but it does a lot to help me continue bringing you new content. Thank you so much for your support!
Today I'm looking at the new Colorblock Mini Crosses set from Spellbinders. These new color block dies come with two dies. The first one cuts out a solid shape for your base layer. The other die cuts out the same shape in a nested pattern. The second die, the one with the nested shapes, made me think... I wonder what it would look like if I used it to foil instead of cut...
Turns out it looks amazing!
Let's take a closer look!
Please note, while Spellbinders did send me product and ask me to create with it, my opinions remain my own.
Paper: Neenah Classic Crest Solar White
Dies: Spellbinders Color Block Mini Crosses, Butterfly Bliss Garden Shutter
Foil: Spellbinders Rose Gold, Silver
Hot Foil Plate: Spellbinders Yana's Special Sentiments
When you foil with dies, the lines are much thinner, and the foiling more subtle, but that came make for really great backgrounds that have visual interest without overwhelming the card!
Each machine is different, so you may need to do some test runs with this, but for my machine, I foil with a die the same way I foil with a hot foil plate, but I add in a cardstock shim. Super easy!
Creating the background was a little more complex. I needed to foil the die 12 times to cover the card front, and I needed a way to make sure it was lined up perfectly each time. So I die cut the base shape 12 times from scrap cardstock, figured out my placing on a grid, then taped them together.
Once I had my template made, I placed that over my card front, and lightly traced the shapes.
With the pencil lines in place, I could easily align the lined die to where it needed to be. A little piece of tape at the top creates a hinge, so the die can be lifted and the foil slipped in, then the die falls back down exactly where it was.
Once I had my method figured out, it really wasn't that hard to do. The hardest part was when I was working on the last row. You can't stick the tape over an already foiled area or you risk removing the foil, so I had to place my hinge very carefully in the last row.
While this would look amazing in a solid color, I had to go a step farther... I alternated between Rose Gold and Sliver. It was a time consuming process, but one that I would do again!
A foiled sentiment with a bold foiled border helped pull the whole thing together.
I have more fun projects using the Mini Colorblock dies coming up, so stay tuned!


Comments
Post a Comment