sweet as icing...
Good morning everyone! Thanks for stopping by. Today is once again my turn to play over at the Creative Inspirations Paint blog HERE. Our challenge was to use the CI paints as "icing" on our embellies... how fun is that?!!!
Now, this post may be picture heavy, but stick with me, I have a little tutorial to go with my project.
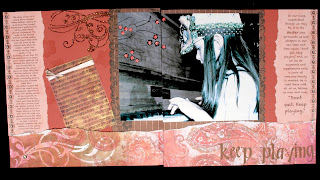
So, with no more chatter, here is my project.

Paper: Bazzill, My Minds Eye, Vellum, Acetate, Shrinky Dink material
CI paint: "Rustic Red"
Ink: Distress ink, Staz-on, Memento, VersaMark, Alcohol ink
Stamps: Fancy Pants "Fresh Mod", "From the Garden"
Prima "Music"
Other: Pearl ex, rhinestones, glitter
Inspiration & Journaling: "Don't Quit, Keep Playing" by Ann Woodland

here is my "icing". Those fun little flowers are Shrinky Dink charms covered in the yummy CI paint.
If you stick with me, I'll show you how I did this. *YAY*

This sparkly swirl was made by stamping the swirl, then tracing it with a liquid glue, then coating with glitter. Yeah, I know, it is a little time consuming, but I love the effect.

The music was stamped on to a piece of acetate with Staz-on. I then used Alcohol ink Gold Mixative with a little blending solution to get the marblized shimmer.

A little ribbon, and a few stray stamen I found in my flower stash give the sheet of music a little something extra.

I used a mask and reinker/pearl ex in a mini mister of water to create this "ghost" shape. The gems were clear, but I colored them with a little alcohol ink.
Wow, if you are still with me, thanks! On to the exciting stuff...
Shrinky Dinks!!!
I remember playing with these when I was younger, and since I am still a just a little girl at heart, I still like playing with them. *there is just something kinda magical about watching your shape shrink...*
You can make these little embellies in any size and shape you want to match your project.
You can cut the material with scissors, dies, punches.. I think the cricut can even cut it, but I don't know what settings...
Another fun thing you can do is stamp on it with Staz-on... Try cutting out a stamped image, making a charm with an image, or just jazzing up a cut with swirls...

For today's project, I used two punches. I punched out the flowers, then I used a hole punch to punch out the centers. After they are punched, apply heat with your heat gun. They do curl, but they should flatten out when the entire shape has shrunk to size. I like to hold my punches down with either the cricut spatula , or the cricut hook tool... *any metal will get hot & can burn you!!!! Be careful!!! You have been warned... gee, wish I would remember that little tidbit of wisdom..... hmmm....*

Place your shrunken embellies on the sticky side of a post-it, or masking tape. This is a simple way to hold small items when you are painting them.

Here is one painted... They are hard to photograph... To show the shine, you can't see the color, to see the color, you can't see the intense shine. Just trust me, you can see both just fine in real life. They are amazing!

When I first started experimenting with this technique, I was asked if I paint before or after shrinking.... In all honesty, I hadn't even thought of painting BEFORE since paint usually doesn't react well to intense heating...
Of course, I HAD to try it just to see. Well, the above pict is the result. Fabulous, huh? Both were painted with the same "Sapphire" CI paint. The one on the left was painted after shrinking, and the one on the right was painted before shrinking. Both ways work great! Just depends on the look you want. Painting before you heat will intensify your color, but it won't hurt your shine!
So, grab your cute jars of paint, give them a shake, and play!
Remember to click on over to see what other members of the DT have to share HERE. And leave them some love.. after all, we all like to feel that we aren't talking to ourselves. =)
i LOVE your LO - it is a gorgeous LO and a gorgeous picture! your tutorial is fantastic! thanks so much!
ReplyDeleteI may have to try this...my kids got into my shrinky dink stash but I think I have one sheet left and I have hardly used my paints...and I have cut this on the cricut but I can't remember the settings either...I do know you don't need multi cut as I have done it on my baby
ReplyDeleteWow! I love your layout! The flowers are beautiful! Thanks for the instructions!
ReplyDeleteOoooohh pretty!! Love the glitter swirl (worth the work) and the shrinky dink flowers!
ReplyDeletegreat layout super job of using shrinky dinkys
ReplyDeleteI really enjoy your tutorials Kassi, they are so informative.
ReplyDelete