All about the sentiments with Spellbinders...
Hello my fabulous friends!
There is something fun about being shaken from a rut by being asked to use art supplies you wouldn't normally pick up, and finding out you really enjoy them! That's what happened with the new large glimmer sentiments from Spellbinders newest release. Usually I'm focused on the images, and the sentiment is almost an afterthought because people expect a sentiment to be on the front of a card.
Well, today we are shaking that up by making the sentiment loud and proud, and I'm really enjoying the change of pace!
Let's take a closer look!
Please note, while Spellbinders did send me product and asked me to create with them, my opinions remain my own.
*Affiliate links have been used, this doesn't change the price you pay, but it does really help me continue bringing you exciting new content, so thank you!
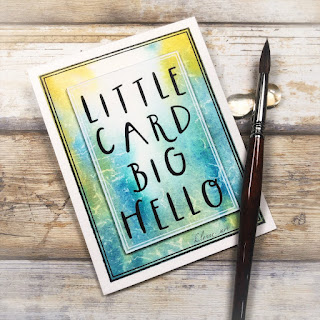
First, let's take a look at Little Card Big Hello...
The sentiment is BIG, while still not completely filling the space of a typical A2 card. I found that it fit PERFECTLY in the 3rd biggest Essentials Duo Lines Glimmer Rectangle (and I used the largest rectangle for the larger border).
This entire front panel is technically one layer... I know the middle is popped up, but it started as a single sheet of watercolor paper cut to 4.25x5.5. I used masking tape to create a 0.25 inch border around the panel (and also to attach it to my board). After that I just played with watercolors and water. By first wetting the whole paper, I was able to get the blue and yellow paints to mix and swirl beautifully by dripping them on and tilting my board.
Once the background was dry, I foiled the large rectangle (which fit nearly perfectly on my slightly imperfect paint edge), and the sentiment in Opaque Black. I then added in the smaller rectangle using Opaque White. This was my first time using the Opaque foils, and I'm LOVING them! They are matte instead of shiny, which can be a nice option!
The sentiment turned out perfectly! The rectangle borders had a few problems (not uncommon when foiling detailed things on watercolor paper) but they were easily fixed with a black pen and some white gouache.
I then used a craft knife to cut out around the smaller rectangle, added some black foam behind it to add dimension and glued it back in the window. I love that the background is continuous even with the dimension!
Up next is Buy Me Craft Supplies, and I'll be honest: I can't really think of anyone I would send a card to that says "buy me craft supplies and call me pretty". I can see how it might be super fun to give to a significant other, or maybe another crafting friend.... it's just not the kind of card I generally use.
-HOWEVER-
It does make and absolutely adorable little sign to hang in my studio!!!
This was made in a very similar fashion as the card... Masking some 4.25x5.5 watercolor paper, then creating a watercolor background... This time I used the Beautiful Butterflies 3D embossing folder to create a design and added in some splatters.
I used Satin Gold foil for both the sentiment and the largest rectangle from the Duo Lines Glimmer Rectangle set. I've fallen in love with the softer shine of the satin finished foils! They are my most used foils!
Since I didn't have a frame, I glued it to a piece of foam core board to give it stability without adding much weight. I have a little tiny easel that I got at the craft store for a couple dollars years ago that is sized perfectly for this sign!
I'm still looking for the perfect place to put this sign, but for now it lives on my scanner, and it makes me smile!


Comments
Post a Comment