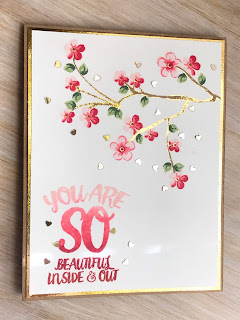
distressed foiled stamping
Hello my fabulous friends!
I have a confession to make...
I like shiny things.
I love the Minc foils and how pretty and shiny they make things! Naturally, I wanted to incorporate that in my stamping...
Ink: Altenew Mocha, Frosty Pink, Coral Berry, Ruby Red, Grapevine, Frayed Leaf, Forest Glades, Evergreen
Other: Heidi Swapp Minc foil, Reactive Mist
Step 1: Stamp the branch from Altenew's Vintage Flowers with brown ink. It's best to use a stamp positioning tool for this because we are going to stamp this same image again later. I'm using my MISTI, and just leaving the stamp right where it is for now.
Step 2: Start stamping flowers. These are also in the Vintage Flowers set
Tip: If you have the dies, go ahead and die cut a bunch of blanks... You can then play around with the placement and sizes before you commit to ink.
Step 3: Keep building the layers...
Step 4: Add leaves... I love the tiniest leaf and it's layers on the Vintage Roses set with these tiny flowers.
Ok.. Now to add the foil...
Step 5: Create your own ink pad by cutting a piece of Rangers' Cut-N-Dry foam and spread on some Heidi Swapp Reactive Mist. You don't need a ton, just unscrew the spray top and use the long tube to smear some on white foam.
Step 6: Remember how we left the branch stamp in the MISTI? Here's why. Ink the branch up with your Reactive Mist ink pad and stamp over your branch. You can also stamp the centers dots of the flowers with the Reactive Mist. Let this dry COMPLETELY.
Step 7: Once completely dry, cover with a piece of Minc Foil and send it through your Minc machine or laminating machine.
So pretty!!!
*NOTE: When you use the Mist to create a stamp pad, the liquid will pool around the edges of the stamp. You will not get a solid stamped image with this medium. However, I wanted the distressed look of the edges being foiled.
So there you have it.. A way to incorporate hints of foil in your stamping....
Have a wonderful weekend!
Enjoy!
~Kassi


Comments
Post a Comment