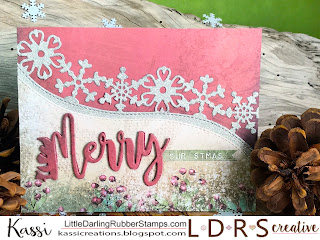
custom embossed word banners
Hello my fabulous friends!!!
I was one of two designers that shared a project on the LDRS Creative blog today! Check it out by clicking HERE to see the quick tip I shared, and the amazing project that my very talented teammate Raluca shared. So much talent on that team! I'm inspired by them, and I hope you are too!
Paper: LDRS Creative Winter Land; The Paper Studio Glam Glitter
Dies: LDRS Creative Merry word die, Snowy Day border die
I wanted to challenge myself to make a card with the focus on dies, and NO stamps allowed....
Wait... No stamps?!?!?
I know, crazy!
I love stamps! They are generally the focal point of my cards....
But that's what makes this a challenge!
And honestly, pushing myself to do a style or concept that I generally don't do is a great way to get myself out of a creative rut and generate new ideas.
Since I honestly love these dies, it was actually a lot easier than I thought it would be.
The hardest part was finishing the sentiment.... I wanted the word "Christmas", but it needed to be small.... and I couldn't stamp it... So I got creative.
I promised on the LDRS Creative blog that I would go into details on how I made the custom word banner... So, here we go!
First off, you will need an embossing label maker. Not one of the new ones that print labels... I mean the older kind that you squeeze the handle and it embosses the letters on the plastic tape.
*note: your's doesn't have to be QUITE as old as mine... This is one I inherited from my grandfather, and we'll just say that the copyright date on the instructions says 1965.
You can still find embossing label makers on sites like Amazon...
Step 1: You need to cut a strip of card stock the width of the tape your label maker uses... Mine actually allows two sizes, so I chose the 1/4 inch size. There are two important things to note with this step...
First: The paper. You need to use a heavier weight card stock that has a colored front and a different color core (the more contrast between the printed color and the core, the better.) The paper packs that LDRS Creative sells work perfectly! They are heavy weight, with a printed front and a white core. I used the more solid colored end of the paper so it would be easier to read when I'm done.
Second: Exact measuring and cutting is really important! If you cut your strip too wide, it won't go through the machine. If you cut it too narrow, it will slide around and make things all skewed.
Step 2: Remove your tape roll, and slide your paper strip in, loading it exactly as you would load the normal plastic tape. For mine, I open the handle, feed it through the slot, with the top side of the paper facing up... I have no idea if all label makers load the same... just load the paper as you would load the tape, and you should be fine.
Step 3: Emboss your message.... following the instructions for your label maker. For mine, I spin the letter wheel until the letter I want is in the metal bracket, then I squeeze the handle. If the paper is cut well, it should move through the feeder without any problems.
Step 4: To make the letters pop, take a sanding block (or an emery board ) and LIGHTLY go over the embossed letters. You don't want to flatten them, you just want to sand off the color from the raised areas to expose the core.
I stopped here.. I cut the banner down to size and glued it on.
If you want it to look more like the original plastic tape, go ahead and put a layer of Glossy Accents over the top. It will give it that plastic sheen.
Do you make holiday cards? Are your's done? Have you started?
Hopefully today's post have given you some inspiration no matter what projects you are working on!
Enjoy!
~Kassi


Comments
Post a Comment