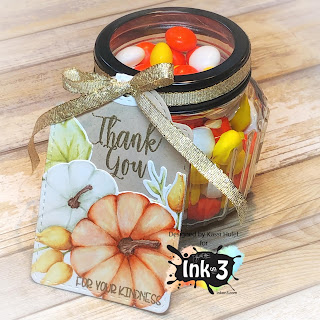
pumpkin tag...
Hello my fabulous friends!
As a kid, I was taught to say 'thank you' when people did something nice for me... I remember one time, while cooking dinner for an important event, our cheese grater broke... we didn't have time to go to the store, so I mom called our neighbor and asked if we could borrow theirs... It wasn't a big deal, and they were happy to lend it to us. However, before returning it the next day, my mom had me stick suckers into each of the grater holes, turning it into a candy bouquet... She wanted to make sure they knew that she was grateful... both for the borrowed cheese grater, and their friendship.
That's why I make so many 'thank you' cards and treats...
Let's take a look at how to make this fabulous fall tag!
Paper: Strathmore Bristol Smooth; Neenah Desert Storm
Stamps: InkOn3 Pumpkin Patch, Roses in Bloom
Ink: InkOn3 Fadeout, Juicy Clear
Coloring: Zig Clean Color Real Brush
Orange- 904, 070, 060, 032, 055, 028
White- 098,073
Brown- 065, 066
Green- 093, 046
Yellow- 061, 067, 055
Dies: InkOn3 Pumpkin Patch; La-La Land Crafts Large Stitched Tag
Embossing: InkOn3 Gold Rush embossing powder
Other: ribbon, jar, candy
Step 1: Stamp and color the Pumpkin Patch image... I used Fadeout ink and my Zig markers for a beautiful no-line watercolor.
Step 2: Using your favorite tag die (or hand cutting from a template), cut your pumpkin image into a tag. Cut second tag from a secondary paper (I used kraft, but you could chose another color, or even a fun pattern!)
Step 3: Next we want to cut out the pumpkins.. but only along the TOP edge... to do this, use some washi tape to tape the Pumpkin Patch die over the image, then hang the tag part way off the cutting plates. It will only cut where the plate is.. so we just need that top edge on the plate.
Step 4: If you want extra leaves, use the Pumpkin Patch die to cut them out of your tag scraps. If your tag has stitch lines like mine does, figure out where on the tag your leaf will go and use the tag die to cut it... this way the leaf will have the stitch lines.
(don't mind my extremely well used, but not very photogenic cutting plate...)
Step 5: Adhere the extra leaves, then the pumpkins to the second tag. Everything should line up flawlessly.
Step 6: Stamp a sentiment in Juicy Clear ink, then heat emboss with Gold Rush embossing powder.
Step 7: Add a matching gold ribbon...
Fill a cute jar with candy, and tie your tag around it, and you're ready to go!
*bonus tip: For a fun, clear, and food safe lid, stretch some kitchen cling wrap over the mouth of a canning jar, and secure in place with the metal ring.
See you soon!
~Kassi
~Kassi
*Project designed for Inkon3: some product provided by company.
For more inspiration, follow me on:
Facebook, Instagram, Pinterest, and Youtube
*Affiliate links used when possible. This doesn’t affect the price you pay, it simply allows me to continue bringing you better content. :)


Comments
Post a Comment