masquerade
Happy Thursday all! I hope you are all having a fabulous day!
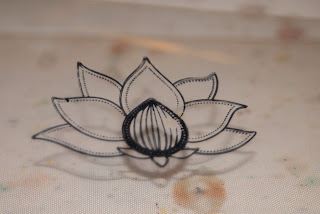
Today I have another project for the Creative Inspirations DT blog. Our challenge was "Clearly Sparkling!" *or in other words, use the CI paints on something clear like acetate, acrylic... you get the idea*. So, I chose to do a very simple yet elegant acetate card.

And laying down flat for better photo viewing pleasure...

Paper: My Minds Eye, Acetate
Ink: Staz-on, Memento
Stamps: Studio G, Inkadinkado "Hello Hummingbird", Basic Grey "Filagree"
Creative Inspiration Paint colors: Tanzanite, Buttercup, Winter Frost, Evergreen
Other: ribbon

I stamped my image directly onto the acetate with the Staz-on ink. I then painted on the back of the image with CI paint *painting on the back just helps keep your stamped image lines nice and clean*. With non-porous surfaces, you need to put on a nice thick coat for even coverage... however, for the petals of the flower, I used a thinner coat and applied it in a dabbing motion. This leaves it with a textured look.
I painted a white/sheer ribbon with Tanzanite CI paint to match my flower. *to find out more on that technique, see here or here*
So, there you have it. Quick... Simple... Stunning. The shimmer of the paint looks fabulous on the acetate! *it looks even better IRL!!!*
There are more amazing projects over at the Creative Inspirations Blog here. Go check them out and leave some love for the hard working girls on the DT.
....................
Ok, so I know I haven't done a B2B in a while... That is why I thought I would do one today. Yup, a B2B using the CIDT challenge project as a sample project. So, for today's B2B, I give you...
MASKING (with stamps)
I know this is an old technique, but I thought I would share it for those who may not be familiar with stamping, or as a refresher for those who have learned this before, and maybe forgotten to use it in a while.
I love this technique because you can achieve so much dimension with little effort! It also gives you endless ways to combine your stamp images for a very personal touch. *and as a bonus, it doesn't require fancy tools... yay!*
So what do you need?
Your choice of stamps
the paper/project you want to stamp on *yes, that is kind of a "duh" thing, but thought I would be thorough =)*
your choice of ink
a good old fashion pair of scissors *you may need to go hunting for these... I sometimes think people may be forgetting how to use them with all the punches and die cutters.... hehehe*
and, the secret weapon...
Sticky notes
Step 1: Stamp the image you want in the foreground on to your project.
For this example, I used Staz-on in to stamp on my acetate card.

Step 2: Stamp that same image onto the front of a sticky note. Make sure that you stamp at least part of your image over the part that is sticky on the back *this will serve as the adhesive that will hold your mask in place*

Step 3: cut out your image. Do this as neatly as you can. Some people like to cut slightly on the inside of the line to insure that there is no haloing *that pesky white line you can get around your finished image if your mask covers beyond the stamped line* Using a pair of sharp precision scissors makes getting in the tight places easier.

Step 4: Place your mask on top of your project. Take the time to line it up as exactly as you can.

Step 5: Now you can stamp the next layer of stamps right over the mask. When the mask is removed, this layer will appear to be directly behind the first image.
Step 6: Leaving the first mask in place, you can continue stamping and adding masks for as many layers as you want. Just remember to work from foreground to background.

Step 7: remove all masks.
See, told you it was simple! It is very effective though. Give it a try on your next stamped project!
now how freaking cool is that?...love it!..
ReplyDeleteFabulous!! I love the way you did this on the clear card. Thanks for the wonderful tutorial!!
ReplyDeleteStunning card! and wonderful tut!
ReplyDeleteI love your tutorials- I am very visual, so really enjoy the look-see. Beautiful card and love all of the sparkle!
ReplyDeleteBEAUTIFUL job!! I love how you made thisa card! LOVE the shimmer!!
ReplyDeletegreat tutorial and stunning card!
ReplyDeleteI love how you show off the paints while teaching some type of technique. I get a lot of feedback on how wonderful your cards are!!!
ReplyDelete