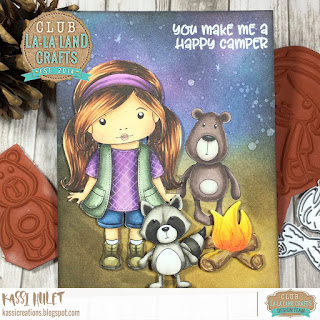
the camping scene with Club LLLC
Hello my fabulous friends!
As the last days of summer slip through our fingers, let's squeeze in one more camping trip...
Paper: Neenah Classic Crest Solar White, Georgia Pacific white cardstock
Stamps: Club LLLC Happy Trails, Happy Camper Marci
Ink: Distress Ink Vintage Photo, Ground Espresso, Chipped Sapphire, Peacock Feathers, Black Soot, Seedless Preserves; Versamark; Uniball Signo
Coloring: Copics
Bear- W0, W1, W10, E70, E71, E74, E77, E79
Raccoon-W00, W0, W1, W2, W3, W4, W5, W6, W7, W9, W10, 110
Fire- Y15, Y19, YR04, YR09
Logs- E55, E57, E59
Skin- E30, E31, E33, RV42, E04, R00
Hair- E53, E39, E29, E49
Vest- BG90, BG93, BG96, BG99
Shoes- E81, E84, E87, E89, W5, W7, W9
Shirt-V01, V15, V17, E57
Pants- B93, B95, B97, B99
Socks- C0, C3
Dies: Club LLLC Camp Fire
Other: Ranger Perfect Pearls; embossing powder
Something about the August 2018 Club La-La Land kit, with it's camping stamps and dies, has put me in the mood to create simple Distress ink scenic backgrounds...
These stamps and dies work BEAUTIFULLY for creating scenes. I LOVE that! And the animals are so much fun to color!
I kept the background on this one really simple... I started by spongeing on some Distress ink to create the ground... I went with a couple shades of brown, and a yellow where I wanted my fire to be. I then blended on the sky.. I didn't bother masking, I just let the ground fade into the sky. I did mask the ground off before flicking my Perfect Pearls/ water mixture at the sky to create the stars... Nice and simple, yet very effective!
I wanted to have lots of dimension, so only the bear is glued directly onto the front panel... Marci and the fire have one layer of foam tape, and the raccoon has two layers of foam tape. By doing this and overlapping the various elements, you get the sense of a lot of depth.
I have been really loving creating galaxy skies.. I have been seeing other people do it for quite some time, but hadn't really found the right card to try it on.. These camping cards have been PERFECT for this!
I wanted my sentiment in the sky, but I didn't want to mount it on anything... so I chose to heat emboss it in white so it would really pop against the dark sky.
Paper: Neenah Classic Crest Solar White, Georgia Pacific white cardstock
Stamps: Club LLLC Happy Trails; LLLC Shine Bright
Ink: Distress Ink Vintage Photo, Ground Espresso, Chipped Sapphire, Blueprint Sketch, Black Soot, Seedless Preserves; Hero Arts Unicorn; Versamark; Uniball Signo
Coloring: Copics
Moose- E53, E35, E37, E29, W8, W6, W4, E51, E53, E35, E55, E84
Branch-E55, E57, E59, YG25, YG67, G28
Camper- BG11, BG13, BG15, BG18, C1, C3, C5, T5, T7, T9, E55, E57, Y15
Shadows- W6, W4
Grass- YG03, YG17, G09
Dies: Club LLLC Camper, Roasting Marshmallow
Other: twine; embossing powder
This background has more masking, but it's still very simple... I hand cut some mountains and the lake edge from masking paper... then it was just a matter of masking various portions of the card and blending on the inks.
I wanted this card to be a fishing card instead of a campfire card, so I took the stick from the Roasting Marshmallow die, and instead of adding the marshmallow, I tied a string to the end. I then cut a tiny slit in my water and threaded the other end of the string through and secured it to the back of the panel. A few sketched in water rings, and you are ready for some fishing!
In order to create a good sense of depth, I added some foam tape behind the moose and his fishing pole (since he is the object closest to us, he would pop out the most) and I did some inlay die cutting for the camper (Die cut the camper out of the background, then nestled the colored camper into the negative space). This helps the camper recede into the distance because it is flush with the card panel instead of stick up.
And, if you look close, you can see some faint stars in the sky... I didn't want them to be over powering or distracting, so I used a sponge to pounce on a little white ink to the Shine Bright background and stamped it over my sky... You only notice the stars when the light hits it right... I love that subtle detail!
The stamps and dies in this Club LLLC kit are only available in the club kit... for at least the next 6 months. The cutoff billing date for Club LLLC is the 17th of each month... So if you joined before then, your kit will be arriving soon! If you haven't joined yet, but love what you are seeing, here's what you need to do...
JOIN THE CLUB by clicking HERE.
After you have been a member for 2 months, you can request to purchase past kits! YAY!
Club LLLC is a subscription club, and membership is $39.99 (plus shipping). For that price, you will get approx. $70 worth of product (rubber stamps and thin dies), as well as a bunch of exclusive tutorials to get your creative juices flowing with each kit!
If you want to read through all the fine print, you can find it HERE.
See you soon!
~Kassi
For more inspiration, follow me on:
*Affiliate links used when possible. This doesn’t affect the price you pay, it simply allows me to continue bringing you better content. :)


Comments
Post a Comment