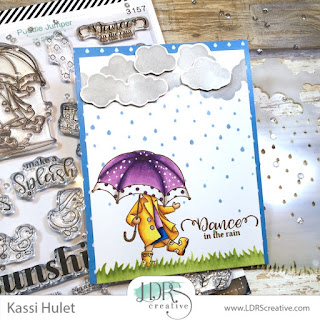
puddle jumper fun...
Hello my fabulous friends!
What do you do when it rains? Well.. You could dance in the rain... or you could grab some stamps and ink and start creating....
Paper: Neenah Classic Crest Solar White; LDRS Creative Puddle Jumper
Stamps: LDRS Creative Puddle Jumper
Ink: LDRS Creative Coffee Bean, Olive Branch, Swimming Hole, Alloy: Uniball Signo White
Coloring: Copic
Skin- E30, E31, E33
Yellow- Y13, Y19, YR23, YR27
Blue- B24, B37, B39
Purple- V000, V12, V15, V17, V09
Black- C8
Gray- C3
White- W0, W3
Stencil: LDRS Creative Rainy Day
Other: LDRS Creative Stamping Mask Paper
Step 1: Stamp the umbrella kid on some Stamping Mask Paper
Step 2: Using a sponge or blending tool, apply ink to the grass edge of the Rainy Day stencil and blend it off onto a strip of Stamping Mask Paper.
Step 3: Fussy cut out both masks. For the grass mask, cut along the line that was against the edge of the stencil. This will allow you to mask grass made using the stencil.
Step 4: Tape the Rainy Day stencil over a 5.5" x 4" panel, and use an ink blending tool and Olive Branch hybrid ink to stencil grass across the bottom of the panel.
Step 5: Cover grass with the grass mask.
Step 6: Using some clear tape, mask off the puddle splash of the umbrella kid stamp.
Step 7: Ink up the stamp with Coffee Bean ink, remove the tape, and stamp on your inked panel.
Step 8: Cover stamped image with mask.
Step 9: Replace the Rainy Day stencil, and apply Swimming Hole ink to the rain drops and Alloy ink to the clouds.
Step 10: Remove the masks, and color your stamped image.
(if you are interested in the Copic coloring portion, I have a video for that on my channel... you can find that HERE.)
Step 11: Using a ruler, draw a line 1/4" from the top... Skip over where the clouds cross the line.
Step 12: Cut along the line, fussy cutting around the clouds.
Step 13: Cover an A2 card base with some raindrop paper from the Puddle Jumper 6x6 pack. Adhere the stamped panel to the front of the card.
Step 14: On a separate piece of cardstock, use Alloy in and the Rainy Day stencil to create more clouds.
Step 15: Fussy cut the extra clouds and adhere to the card front using foam tape.
Step 16: Finish it off by stamping a sentiment in Coffee Bean ink.
For those of you who are interested in checking out the video tutorial for this project, you can find that video HERE.
And don't forget, if you are interested in the Copic coloring portion, I have a video for that on my channel... you can find that HERE.
See you soon!
~Kassi
~Kassi
For more inspiration, follow me on:
*Affiliate links used when possible. This doesn’t affect the price you pay, it simply allows me to continue bringing you better content. :)


Comments
Post a Comment