torn (ldrs weekly video plus tutorial)
Hello my fabulous friends and happy Saturday!
Ready for a splash of color?
Today's video and tutorial is all about... stencils, hybrid inks, and a little bit of shimmer!
Paper: Neenah Classic Crest Solar White
Stamps: LDRS Creative Puddle Jumper
Ink: LDRS Creative Alloy, Evergreen, Key Lime Pie, Bali Blue, Dark Wash Jeans, Raven
Stencil: LDRS Creative Playful Patterns
Other: Ranger Perfect Pearls; clear jewels
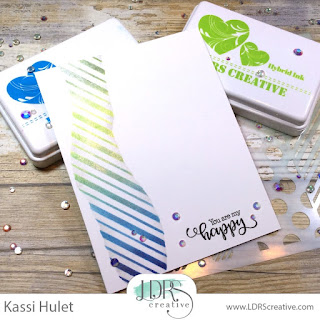
Check out both the blend and the shimmer! SO PRETTY! I love the color you get when you blend Bali Blue with Key Lime Green!
This is a fun and easy technique that lets you create fabulously colorful cards quickly! Let me show you how...
(If you want to skip right to the video, you can check it out HERE)
Step 1: Tear a scrap piece of cardstock in half... an irregular edge will give more interest to the finished piece. These two pieces of paper will become masks.
Step 2: Tape the masks down over your card front. Make sure the gap between the two pieces is not wider than the stencil. (In the case of the Playful Patterns stencil, the gap can't be any wider than about 1.5" )
Step 3: Using a sponge or blending brush, ink the edges of the mask using Alloy ink. Start on the mask, and brush out onto the card. It doesn't need to be all the way across the gap, you just want a bit of a shadow alone the edge of both masks. This will give definition and dimension to the "torn" edges.
Step 4: Tape the stencil over the masks (keep those masks in place!). Taping it down will ensure it doesn't shift during the inking process.
Step 5: Chose a light and a dark hybrid ink from the same color family (example: light and dark blue). Start by applying the darker color first at the bottom 1/4th of the gap, then apply the lighter color to about half way up the gap. Be sure to overlap the two inks slightly.
Step 6: Chose a light and dark hybrid ink from another color family (example: light and dark green). Start by applying the darker color first to the top 1/4th of the gap, then apply the lighter color to about the half way point. Be sure to overlap the light and the dark slightly, as well as the light green with the light blue slightly.
Step 7: I like to go over the 4 colors a second time, really working the areas where they overlap to create a seamless blend between colors.
Step 8: Working quickly, remove the card front from the stencil and masks, and cover with a thin layer of Perfect Pearls. Use a soft paint brush to pounce the powder into the ink. Then use the brush to whisk away any excess powder. The shimmery powder should stick to the inked areas and no where else! Set the powder by spritzing some water into the air and waving the card front through the mist.
Typically hybrid inks dry quickly, and thus are not capable of doing things like this... however I have found the the LDRS hybrid inks work AMAZINGLY well for this as long as you work quickly! It is one of the things I love most about these inks!
Step 9: Add a sentiment... I'm using some sentiments from the new Puddle Jumper stamp set... I inked up just the word "happy" from the "be happy" stamp, and stamped that in Raven hybrid ink.
I then stamped "you are my" on top of "happy". I love that this set allows you to build your own sentiments!
See how fun! And it really is a quick card! In real life it looks absolutely amazing!!!
Be sure to check out the full video HERE!
Be sure to check out the full video HERE!
See you soon!
~Kassi
For more inspiration, follow me on:
*Affiliate links used when possible. This doesn’t affect the price you pay, it simply allows me to continue bringing you better content. :)


Comments
Post a Comment