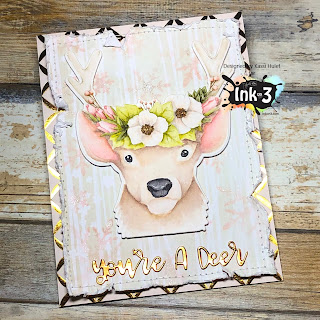
oh deer...
Hello my fabulous friends!
“Oh Deer” the holiday season is near, but have no fear the new Ink On 3 stamp set is here!!!
Come one, come all and prance along with the Ink On 3 Creative Team for some amazing holiday card ideas and inspiration!
Enter to WIN a $25.00 Ink On 3 shopping spree!!!
To enter ~ leave a comment on each Creative Team Members' blog hop stop. That’s it! The full lineup is listed below.
The last day to enter is on Monday, November 4, 2019 and we’ll announce the winner on Wednesday, November 6, 2019 over on the main Inkon3 blog.
Paper: Strathmore Bristol Smooth; Craftsmith Honeydew; Recollections Cherry Blossom; DCWV Metallics
Stamps: Inkon3 Oh Deer
Ink: Inkon3 Fadeout, Liquid Pixie Dust; Distress Ink Tattered Rose; Dr Ph Martin's Bleed Proof White
Coloring: Zig Clean Color Real Brush
White Flowers- 073, 901, 066
Berries- 069, 064, 066
Roses- 230, 069
Leaves- 093, 046, 043
Antlers- 075
Deer-064, 068, 069, 230, 902
Dies: Inkon3 Oh Deer
Other: La-La Land Crafts It's Snowing Stencil
Let's take a closer look...
The result is a soft background with frosty sparkle... so pretty!
Inkon3
Cheryl Luu
Erica Andersson
Ilda Dias
Jaycee Gaspar
Jeannie Lieu
Kassi Hulet {you are here}
Courtney Miles
I started by stamping the deer in Fadeout ink, then watercoloring with my Zig Clean Color Real Brush Markers.
Coloring tip: When doing no-line coloring, it is can be easy to lose small details... like the highlights in the eyes... Dr. Ph. Martin's Bleed Proof White is great for adding the details back in. It can cover even dark colors completely, and it won't pick up the color underneath.
Once the deer was colored, I used the coordinating die to cut it out.
For the background, I chose a monochrome patterned paper, then stenciled in some snowflakes with Tattered Rose distress ink. Before moving the stencil, I dripped a couple drops of Liquid Pixie Dust onto a make-up wedge, and pounced it through the stencil.. I wasn't going for full coverage, I just wanted some soft sparkle in the snowflakes.
The result is a soft background with frosty sparkle... so pretty!
Now to shabby it up a bit.... I used a distressing tool to tatter the edges, then I used my sewing machine to go around the edge to create a stitched border.
(yes, I use my sewing machine for paper more than fabric.... )
I chose a foiled cardstock to cover my card base, then attached my stenciled piece to the card with some foam tape. I also attached the deer with some foam tape.
Finally, I die cut the 'you're a deer' sentiment from some metallic paper to tie back in to the foiled base.
So what do you think??? Do you love these new Oh Deer stamps and dies?
Be sure to keep hopping, and leave a comment for a chance to win...
Cheryl Luu
Erica Andersson
Ilda Dias
Jaycee Gaspar
Jeannie Lieu
Kassi Hulet {you are here}
Courtney Miles
See you soon!
~Kassi
~Kassi
For more inspiration, follow me on:
Post written for Inkon3- some products were provided by the company
*Affiliate links used when possible. This doesn’t affect the price you pay, it simply allows me to continue bringing you better content. :)


Beautiful card. Love the trees
ReplyDeletein the background. thanks
for sharing. txmlhl(at)yahoo(dot)com
I love the soft coloring and gorgeous gold framing and sentiment!
ReplyDeleteI love all the ideas!! Beautiful card inspiration and all the steps.
ReplyDeleteGorgeous! Amazing background and lovely coloring. The touch of gold is a fabulous addition.
ReplyDeleteSo beautiful!!! Your no line coloring is superb!!! ~ Fleurette
ReplyDeleteOh, the background looks really wonderful. And your coloring is so soft and pretty. Really nice!
ReplyDeleteMarisela Delgado said: What a fabulous card! I love the gold. mariandmonsterd@yahoo.com
ReplyDeletePretty coloring, and I love the background you created! Beautiful card!
ReplyDelete