doubled up...
Happy Friday the 13th my fabulous friends!
Well, ok, so it's getting really close to Saturday for some of you, but some times I'm a little late to the party. LOL!
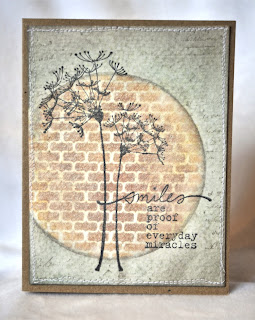
Today I wanted to play with a double stenciling technique.
What got me thinking about this was the new challenge over at Unity. Technically these aren't the right colors, nor does it follow the card sketch... but since they are really relaxed on their rules, I was more inspired by their scrapbook LO sketch... I hope that counts. LOL!
I actually had quite a bit of fun with this card... it "evolved" from a simple concept to what you see here as I was going. So, if you want to give this technique a go, remember, you don't have to do every step... do the ones you like, and skip the ones you don't.
Double stenciling:
Step 1: Tape your first stencil down over your paper. This one should be a fairly simple shape. I just die cut a circle out of a sheet of transparency.
Step 2: Place your second stencil over top of your first stencil, and tape that down. This stencil should be more detailed. This one I cut out of transparency as well using my Silhouette... It is a cut file I made by welding { } together over and over to form a screen. Simple, but effective.
Step 3: Apply your ink/paint/spray.
Now, remove your stencils...
Simple as that!
I used Distress Ink... if you want similar results as mine, that is the key for the next few steps to work.
Step 4: Since Distress inks have some open time (they stay wet long enough to put powders on them) you can brush on Perfect Pearls for a beautiful shimmer. To set the pearls, VERY lightly mist them with water.
Step 5: Once you have lightly misted them, and let it dry... give you paper a bit heavier of a misting. I like to work on a watercolor paper for this because it can take the water, and the colors will run nicely, but manila tags are also fabulous!
When the Distress ink has run and blended to your liking, dry with a heat tool.
Step 6: Which I forgot to take a picture of.... if you want to add some visual dimension to it, get your basic stencil back out, and go around just the edge with a darker color.... you can see it this photo.
Finally... No matter what ink/paint/spray you use for your stenciling, you can use the inside of your basic shape as a mask to protect your stenciled area as you color and stamp around the outside of it.
Enjoy!
~Kassi
Supplies Used:
Paper: watercolor paper, kraft
Ink: Distress Ink, Memento
Stamps: Unity "Insightful Meadows" & "Vintage Handwritten"
Other: Perfect Pearls


Stunning card. Thanks for the great instructions. TFS it all.
ReplyDeletethanks for sharing your great card.
ReplyDeleteGorgeous card & what a fun technique! TFS!
ReplyDeleteGorgeous! Love this technique!
ReplyDeleteWhat a beautiful card, and wow, I love your tutorial! Thanks for playing along with Friends with Flair! :)
ReplyDeleteThanks for the tutorial. :) This is one of my favorite stamps
ReplyDeleteGorrrgeous card..adore that stamp!!
ReplyDeleteHugs
Tracy xxx
Beautiful card! Thanks for the detailed tutorial.
ReplyDeleteThis is such a cool technique. It looks beautiful on your design. :)
ReplyDeleteThat looks like an very cool technique---your card turned out great!
ReplyDeleteThanks for sharing the technique. Love the stencil, and it works so beautifully with the floral.
ReplyDeleteAnother great Kassi tutorial! Love this technique, too! And it's a gorgeous card!!!
ReplyDeleteLovely card and great tutorial thanks for sharing
ReplyDeleteThis card is gorgeous! Thank you for the tutorial!
ReplyDeleteAwesome techniques with two stencils! Thanks for sharing!
ReplyDeleteStunning! Love it!
ReplyDeleteThis is gorgeous! And thanks for the tutorial.
ReplyDelete