creating a wreath with masking...
Hello my fabulous friends!
I don't know about where you live, but the weather around my house hasn't exactly been very warm and spring like... It's been cold, windy, and wet... But I guess that's spring for here! LOL! I've been wanting some sunshine, and flowers...
If I can't get that outside, I guess I'll have to make some bright happy spring cards instead!
Paper: Neenah Classic Crest; Paper Studio Glam Glitter
Stamps: Polkadoodles Blooming Bugs; Penny Black Flower Garden
Ink: Memento Tuxedo Black;
Copic V09, V06, V12, V000, RV10, RV23, RV25, RV29, Y22, Y19, Y15, Y11, YG11, YG23, YG17, YG67, E39, E18, Y19, multiliner
Dies: Lawn Fawn Stitched Trails
Other: LDRS Creative Stamping Mask Paper
I love this stitch line die!!! It gives just the right finishing touch!
Creating your own spring wreath (or any seasonal wreath for that matter) is easy! It just requires a bit of masking...
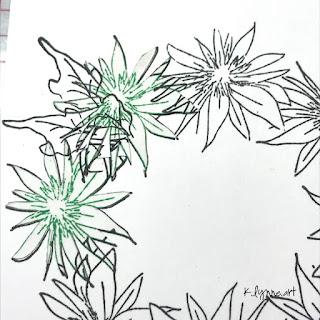
Step 1: Stamp your image onto masking paper... You can do as many as you want, but you only really need 2 masks IF all your flowers are going to be the same.
My wreath was made using only one flower stamp, and one leaf stamp, so I just needed two flower masks.
I'm using LDRS Creative Stamping mask paper for my masks.
Step 2: Cut out your masks... You'll want to cut just inside the stamped line to avoid any halos.
Step 3: You can free hand a circle if you want, but I chose to trace a circle die. I also divided that circle into quarters. I used pen in the photo just to show you. On my actual project, I used very light pencil lines that can be erased BEFORE coloring.
Step 4: Stamp some flowers around the circle... To make things evenly spaced, I stamped one flower on each quadrant line. If you have smaller images, how you arrange them to be spaced evenly might differ..
Step 5: Cover 2 of your flowers with masks.
Step 6: Stamp a flower between the two flowers you have masked.
Step 7: Move your first mask over to the next flower

Repeat steps 5-7 until wreath is full...
You can add in other flowers. leaves, berries, etc in the same way.
*Remember to erase all pencil lines before coloring.. Otherwise the pencil will get trapped under your coloring and be a permanent part of the card.
Have fun masking!
See you soon!
~Kassi
For more inspiration, follow me on:


I love this wreath idea, and of course the coloring. TFS
ReplyDeleteThis is beautiful and I love the colors your chose.
ReplyDelete