the great shrinking ants...
Hello my fabulous friends!
You know what drives me crazy?
ANTS.
I hate when ants take over my house! YUCK!
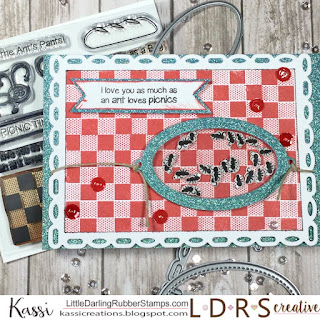
But ANTS have taken over my craft room... and I'm kinda lovin' it!!!
Paper: Georgia Pacific white cardstock; Recollections Glitter cardstock
Stamps: LDRS Creative Ants Pants
Ink: LDRS Creative Raven, Kiss Me Red
Dies: LDRS Creative Scalloped Rectangle
Other: sequins, twine, Shrinky Dink plastic
I wanted the card to look like a picnic blanket, so I die cut the Scalloped Rectangle out of white cardstock. I then used some low tack tape to mask the edges. I stamped the small background stamp from Ant's Pants over and over with Kiss Me Red ink... By doing this, you can create a background of any size, even though the stamp itself is small!
This sentiment just makes me laugh!
This is my shaker box filled with little ants!! Aren't they cute?
And these ants are pretty easy to make too!
We are going to be working on Shrink Film (Shrinky Dinks). LDRS Creative hybrid inks are perfect for this! They work great on non-porous surfaces!
To start, we are just going to stamp our ants on the plastic using LDRS Creative ink...
Here comes the only tricky part... You need to heat set the ink (so it won't smear), but you don't want to melt the plastic yet... SO.. heat it with low heat, going slow.. if it starts to curl on you, take the heat away. You can tell when the ink is dry because it loses it's slightly glossy appearance. As soon as it's dry, take the heat away!
*TIP: I found Ranger's Heat It tool was MUCH easier to do this step with than my normal embossing gun since the heat is more diffused.
I wish that this stamp set had a matching die set.. but it doesn't.. So we have to hand cut. I didn't worry about trying to get around each little leg.. I just left a little white space around the image and called it good. No need to stress!
Ok.. Now heat it again.. and heat it good! You can use the Ranger Heat It tool for this, but it does take longer.. Your embossing gun will make it go quick! Keep the heat on it until it is completely shrunk down. Then allow to cool before touching it
*TIP: Have some tweezers or other such tool handy to help hold your ants in place while heating.. These little guys like to go flying, and they are hot enough to burn your skin... PLEASE be careful!
And now you have your finished ant!!! Notice it has a bit thickness to it now... This makes it really great for a shaker!
*TIP: If your ant isn't laying flat, simply press it flat with an acrylic block WHILE the plastic is still hot. This will flatten it out.
For comparison's sake... Here's the ant stamped onto a piece of paper, and our shrunken ant next to it!
To fill up my shaker, I did 20 ants. And while that seems like a lot, it really didn't take very long to do!
Give it a try! You can turn all sorts of stamps into shaker bits!
For more tips on this project, be sure to visit the LDRS Creative blog!
Out of curiosity, how many of you remember playing with Shrinky Dinks as a kid? They've been around since before I was born, but I don't remember doing anything with them until I was in my teens.. and the package I have now may be that same package! LOL!
See you soon!
~Kassi
For more inspiration, follow me on:
*Affiliate links used when possible. This doesn’t affect the price you pay, it simply allows me to continue bringing you better content. :)


Comments
Post a Comment