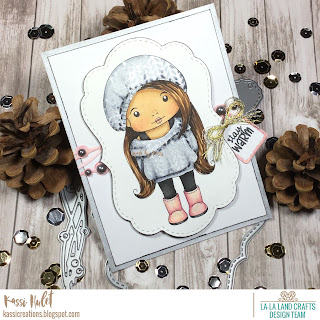
silver and gold... ish....
Hello my fabulous friends!
Welcome back to La-La Land Crafts Monday inspiration! We've had a bit of a break for the holidays, but we are back in full swing again!
This week we were given the challenge of Silver and Gold...
I'll be honest, I didn't feel very inspired by this at first.
Don't get me wrong, I love both silver and gold... I even like them combined... but I like them as accents, not the main colors.
I like color!!!
So I struggled....
But sometimes, facing challenges that stretch you out of your comfort zone can bring about wonderful things!
Paper: Neenah Classic Crest Solar White; Georgia Pacific White Cardstock
Ink: Altenew Permanent Black; Distress Stain Brushed Pewter
Coloring: Copic
Skin- E30, E31, E33, E04, RV42, R00
Hair- E53, E57, E47, E49
Silver- C1, C3, C5, C7
Black- T5, T7, T9
Pink- RV0000, RV10, RV11, RV32, RV34
Other: Ranger Perfect Pearls; embroidery floss, pearls
Let's start out easy... Silver. I knew I want her to have a silver sweater, and I knew I wanted it to be one of those sweaters that have metallic threads... So I did a bit of mixed media....
First things first... We need to color... I used light Cool Gray Copics to color the sweater and hat. This allows me to get in all the shading and dimension before adding anything in that my Copics won't like...
We are going to get the texture and the shimmer in one step... To do that we need to create a reverse mask..
Let's talk masks for just a second here for those who don't know what I'm talking about.. A mask, generally protects an area so you can stamp or color around the mask, without contaminating what you are masking. For instance, if I wanted to add a background to my card, I might mask off Marci before airbrushing clouds so that Marci is protected from the background I'm creating.
For a reverse mask, you mask off everything EXCEPT the area you want to fill in.. It's actually more like a stencil.... a stencil cut to the exact shape of the sweater and hat...
Anyway, that's what I've done here.
Next up, we are going to ink up our Sweater Weather background stamp with some Brushed Pewter Distress stain. Just lightly brush the dauber over the stamp. Be careful not to get too much ink on the stamp. The Stain is very liquid, and if you get too much on, it will pool in all the crevices, which will turn to blobs when you stamp.
Go ahead and leave the large background stamp on the carrier plastic. It's the easiest way to use this kind of stamp.
Rather than try to flip the stamp over, we are going to take our project to the stamp, and rub the back of the project with our fingers. Be careful to ALWAYS hold the project firmly against the stamp with one hand while you rub with the other. You don't want any wiggleing!
When you take it off, it looks something like this. In some lights it becomes super sparkly, while in other lights you just see the gray pattern.
Awesome!
Be careful! The Distress Stain is a water based product, and a runny one at that. Your project needs time to dry, or you may end up with silver smears.
Also note: I can't advise using Copics over any area where you have used metallic Distress Stain. It contains mica, and that could potentially clog the nib of your markers. That is why we colored first.
Now let's move on to the gold part.... I've gone ahead and finished coloring Marci...
I was going to do gold boots... but I just couldn't! I was scared they would end up looking like she was wearing cheap rain boots with her fancy sweater... (yes, I know, if you color gold right, it won't look like bright yellow galoshes, but I was running on way too little sleep, and the fear was real!)
My compromise was to color the boots light pink, and give them a gold coating with Perfect Pearls in the Perfect Gold color. I simply mixed a little bit of powder with some water and painted the boots.
(Again, do this AFTER coloring, not before!)
When the light hits they they have a definite gold tone, but I like the softer feel of the "rose gold" to the "yellow gold". (yes, I know this isn't true rose gold, but, you understand, right?)
Gorgeous!
This is what I mean by stretching yourself. I probably never would have thought to color boots soft pink, then cover with gold mica if I hadn't been forced to find a way to incorporate gold into my personal color loving style! Now it's something I want to incorporate into future projects!
Behind the stamped panel I have a couple of the Bubble Borders colored to match the boots, and I put silver pearls in each of the "bubbles". I added my sentiment to a tiny tag and tied some gold and silver metallic embroidery floss through it.
And there you have it! My take on the Silver and Gold theme!
See you soon!
~Kassi
~Kassi
For more inspiration, follow me on:
*Affiliate links used when possible. This doesn’t affect the price you pay, it simply allows me to continue bringing you better content. :)


Comments
Post a Comment