hop beyond the edge...
Hey everyone!
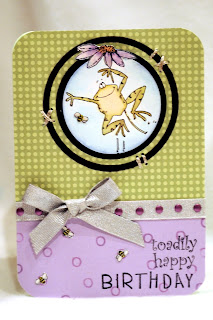
When I first saw the Penny Black "Toadily" stamp set, it just made me smile, so of course, I had to do a fun and happy card... Isn't that frog just adorable!!!
Paper: Me & My Big Ideas, Bazzill, Die Cuts With a View, white cardstock
Stamps: Penny Black "Toadily", Clear Dollar Stamps "Thumbkins"
Ink: Archival Ink (Jet Black), Distress Ink (Forest Moss, Crushed Olive, Spun Sugar, Bundled Sage, Brushed Corduroy, Dusty Concord, Milled Lavender, Tumbled Glass, Broken China, Chipped Sapphire, Mustard Seed), Color Box Chalk (Wisteria)
Creative Inspirations Paint: Silver Frost
Metallic Inspirations: Matt Purple
Dies: Quickuz "Nesting Circles"
Other: Gesso, embroidery floss, ribbon, Perfect Pearls, Glossy Accents
For the ribbon, I pulled out one of my favorite tricks.. white ribbon. I then altered it using CI paint. I also added some of the new Metallic Inspirations by Creative Inspirations, I love that they add a metallic bling without adding additional bulk. These things are thinner than using brads, so they are great for cards that you want to mail.
The frog was "painted" using Distress Inks and a water brush over gessoed card stock. I like watercoloring with ink on paper that has been prepped with gesso because the colors blend so much easier, and mistakes are a lot easier to fix.
I used a nesting circle die by Quickuz to make all my circles and rings. I love the nesting shapes! There is so much you can do with them!
Want to know how to I got the flower beyond the outside of the die? It's easy! You do need to be using a very thin die for this to work... Spellbinders, Cheery Lynn Designs, and Quickutz are some companies that have the super thin dies.
1. Using your die as a reference, make light pencil marks near the area that will extend beyond the edge.
2. Cut around the part of the image that will go past the edge of the die. Use the reference marks as guides of how much to cut. You will need to cut a little bit farther than your marks because the actual blade of the die is set slightly in from the edge you traced.
3. Slip the die under the part of the image you want sticking out, and over the rest of the image. This is what allows you to cut the shape without cutting off the extended part of the image.
4. Run it through your die cutting machine using what ever your normal "sandwich" for this kind of die is. The "sandwich" of plates you use will vary depending on what brand machine you are using.
I hope this inspires you to look beyond the edges of your dies to find endless possibilities!
Enjoy!
~Kassi


All these cards are looking to much fantastic they look amazing and very fun...
ReplyDeleteScratch Card Printing
clear business cards
Plastic Cards
Hi Kassi,
ReplyDeleteI love your card and the way you painted your ribbon.