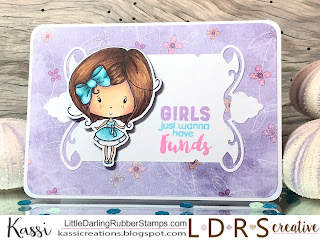
Mini Winnie...
Hello my fabulous friends!
Today I have a fun look another new release stamp and die set from LDRS Creative, as well as a quick tutorial on using a separate new die set a little differently than expected.. You ready?
Mini Winnie
This sweet little Winnie stamp set is a little different from the Winnie stamps you are used to from LDRS Creative.. She is only 2.25in instead of the normal 3.5in, and she is part of a clear set that also includes a storefront, some gift boxes, a shopping bag, and some matching sentiments. She also has a coordinating die set!
Isn't she cute? And she could be used for any occasion.. from birthdays, to holidays, to get well or congratulation... So versatile!
That shaped panel that she and the sentiment are on is part of an older die set Majestic Rectangle Lables
I'll be honest, every time I look at this card I get that song stuck in my head.... LOL!
If you have a stamp positioner (like the Tim Holtz Stamp Press, or the MISTI), it's easy to stamp a rainbow of color on one stamp. I simply inked up one line at a time (wiping off any ink that got on the other lines) and stamped. The Stamp Press keeps the stamp hitting your paper in the same spot each time, so you end up with a perfectly stamped colorful sentiment!
With a sentiment like "Girls just wanna have funds", I figured a gift card inside was appropriate....
To make the gift card holder, I used a die set that is a whole lot more versatile than it might first appear... The new Versatile Doors and Windows Die. This set has SO many possibilities above and beyond being a door and windows.

Today we are going to be using the mail slot die (circled above) that is part of this set. When placed on a door it is a normal mail slot, but when looked at on it's own, it is a small hinged flap. It only cuts on 3 sides, leaving the last side attached... Perfect for what we are doing today!
The first thing we need to do is figure out where we need to place the die... To do this, I took the gift card and drew in some light pencil lines along the two edges I planned to put flaps.
Now get out your mail slot die... If you aren't opposed to marking your dies up, I strongly suggest making some basic lines on the back so you can easily line things up.. I used a fine tip permanent marker to indicate three things...
1) which side the fold is on... this is the edge that doesn't cut.
2) Where the hinge sits on the die... So where exactly the cut lines stop so you know where to line things up.
3) The center of the flap... This just helps you to keep things nice and even.
To create your gift card flaps, you are going to want to line up your 'fold' mark a little outside the pencil line you drew for your card... It doesn't have to be much, but you don't want to cut directly on the line because your gift card has some thickness to it that you need to accommodate.
Use a little low tack tape to keep the die in place and run it through your machine.
Repeat the same process on the other side..
When you are done, you should be able to slip your gift card behind the flaps.
I wanted to dress mine up a little more, so I stamped, colored, and die cut the stack of gifts and glued them onto the flaps (making sure not to glue the flaps shut!)
You'll be able to find this Mini Winnie set at the LDRS Creative store in March!
I'll be back tomorrow with another peek at what is coming to the LDRS Creative store!
Enjoy!
~Kassi


Comments
Post a Comment