meet Ruby... LDRS Creative release day 2
Hello my fabulous Friends!

There are two brand new full size stamp sets from Cre8tive Cre8tions, each combining 8 stamps; Celebration and Flower Power!
Next, we have something for all our Polkadoodles fans! We have two brand new characters, each featuring lovely scenes: Ruby (Celebration, Pretty Cute, So Sassy) and Holly (Delightful Daisy, Feathered Friends, Story Time, Watch It Grow). And fear not, Winnie is also joining the party with the mini set called Let's Go, and some amazing paper doll dies in the Die-licious collection to create to your soul content: A Gift For You, Miss Pretty, Puppy Princess, Super Scenes. What's best is that we came up with the perfect 6"x6" Die-Licious paperpack to combine all skin, hair and clothing patterns as a perfect complement!
If you are more into flowers, then you will simply adore these brand new stamp and die combo sets: If Friends Were Flowers, Love And Smell The Roses.
And did we say we were throwing a surprise party for you all? Thanks to these sweet stamp sets, you can have one, too: Wordalicious, Sweet Treats, Party Time, Life Is Sweet, Ice Cream Party, Goody Gumdrops!
What's even cooler are the interactive stamps (and some even as a die combo!) we are proud to have designed: Going Places, On The Move-Neighborhood, On The Move-Landscape. Adorable critters? Yes! Right here: On The Move, Hippo Hooray, Super Critters!
We also have FOUR new die sets that will help you get a professional look in no time, on top of being simply adorable: Twirling Pop-Up, Barber Stripes Rectangle, Fringe, Scalloped Borders.
Who's ready for mini hybrid inks? We are adding the latest two sets of our very popular Hybrid inks in a mini version, perfect for ink blending, stenciling, stamping, colouring and embossing: At The Beach and On The Farm!
Next, we have two new 6"x6" stencils that are sure to be as popular as the others: Playful Patterns and the Waffle!
Lastly, because we wanted to give you the perfect time with papers AND stamps, we created the new Playful Pattern collection that includes 6"x6" and 12"x12" packs: Homemade Happiness, Candy Counter, Sweet Sensations!
And you can grab the entire release in bundles, because you KNOW you need them all!
Now for what you came to see...
Polkadoodles is introducing a new line of girls into the LDRS Creative family..
Meet Ruby!


LDRS CREATIVE BLOG
JANE
KASSI {you are here}
ALANNA
JEANNIE
ZSOFIA
MARTHA
MELISSA
ILINA
KIRSTEN
MELANIE
RALUCA
See you tomorrow!
~Kassi


Thank you for joining us on our LDRS Creative inspiration week blog hop! We are so excited to feature what was showcased at Creativation in January! There are lots of gorgeous projects using products from our new release. You can even see them in action with step-by-step projects by our amazing designers on their blogs and our own LDRS Creative Youtube channel (make sure you subscribe)!
In this release, we are introducing interactive stamp and die combos, fabulous paper doll dies, and TONS of products to fit everyone's taste!
In this release, we are introducing interactive stamp and die combos, fabulous paper doll dies, and TONS of products to fit everyone's taste!
There are two brand new full size stamp sets from Cre8tive Cre8tions, each combining 8 stamps; Celebration and Flower Power!
Next, we have something for all our Polkadoodles fans! We have two brand new characters, each featuring lovely scenes: Ruby (Celebration, Pretty Cute, So Sassy) and Holly (Delightful Daisy, Feathered Friends, Story Time, Watch It Grow). And fear not, Winnie is also joining the party with the mini set called Let's Go, and some amazing paper doll dies in the Die-licious collection to create to your soul content: A Gift For You, Miss Pretty, Puppy Princess, Super Scenes. What's best is that we came up with the perfect 6"x6" Die-Licious paperpack to combine all skin, hair and clothing patterns as a perfect complement!
If you are more into flowers, then you will simply adore these brand new stamp and die combo sets: If Friends Were Flowers, Love And Smell The Roses.
And did we say we were throwing a surprise party for you all? Thanks to these sweet stamp sets, you can have one, too: Wordalicious, Sweet Treats, Party Time, Life Is Sweet, Ice Cream Party, Goody Gumdrops!
What's even cooler are the interactive stamps (and some even as a die combo!) we are proud to have designed: Going Places, On The Move-Neighborhood, On The Move-Landscape. Adorable critters? Yes! Right here: On The Move, Hippo Hooray, Super Critters!
We also have FOUR new die sets that will help you get a professional look in no time, on top of being simply adorable: Twirling Pop-Up, Barber Stripes Rectangle, Fringe, Scalloped Borders.
Who's ready for mini hybrid inks? We are adding the latest two sets of our very popular Hybrid inks in a mini version, perfect for ink blending, stenciling, stamping, colouring and embossing: At The Beach and On The Farm!
Next, we have two new 6"x6" stencils that are sure to be as popular as the others: Playful Patterns and the Waffle!
Lastly, because we wanted to give you the perfect time with papers AND stamps, we created the new Playful Pattern collection that includes 6"x6" and 12"x12" packs: Homemade Happiness, Candy Counter, Sweet Sensations!
And you can grab the entire release in bundles, because you KNOW you need them all!
Simply use the list at the end of the post to keep hopping!
Each day we are giving away a $25 LDRS Creative gift card to one lucky hopper! To enter leave a comment on each blog in the hop, plus follow us on Facebook and Instagram. Winners will be announced on the LDRS Creative inspiration blog on March 5th.
AND for the release event we are excited to offer some great savings!
Save 15% on the new release*, including already discounted bundles and use code FEB15
(*Coupon valid until midnight EST 3/6/18)
Now for what you came to see...
Polkadoodles is introducing a new line of girls into the LDRS Creative family..
Meet Ruby!

Paper: LDRS Creative Candy Counter; Neenah Classic Crest Solar White
Stamps: LDRS Creative Ruby Celebration
Ink: LDRS Creative Raven
Coloring: Copic
Skin- E30, E31, E33, RV42, E04
Hair- E53, E57, E47, E49
Jeans- B93, B95, B97, B99
Pink- R81, R83, R85, R56, E95, R89
White- 0, E40
Green- YG01, G24, G46
Yellow- Y13, Y17, YE24
Ground- W00, W2, W4
Other: ribbon
Did you see my blog yesterday when I showed you the Swivel Slider Tab Master die set? If not, you can check it out HERE.
There is another little treasure for sliding cards in this die set... Those tiny little ovals.. they let you do fun slider cards where you pull the tab, and something moves in the OPPOSITE direction! Like this hidden gift card!
Let's take a look at how to do it...

Step 1: Stamp and color your Ruby Celebration image.

Step 2: Use the largest die from Garden Escape to die cut a fancy edge. Make sure this fancy panel is wide enough to conceal the gift card with a little extra room.

Step 3: If you want a decorative front panel to your card, go ahead a create it. I made my card about 1/4" thinner than a standard card so there is room for the pull tab to stick out, and it can all still fit in an envelope.
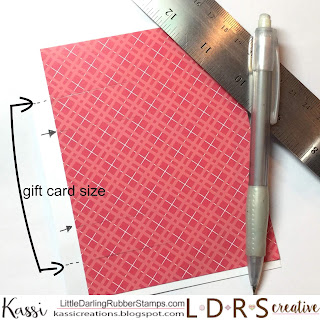
Step 4: Use a pencil to trace the top and bottom edge of where the gift card will sit. (be sure to double check with your stamped panel to make sure everything fits and the card will be hidden. Then draw a parallel line about 2/3" from the top edge of where the gift card will be, and another from the bottom edge of where the gift card will be.
NOTE: in the above photo, the dashed line indicated with the dark bracket is the size of the gift card. The two smaller arrows indicate where my inner lines are. (Pencil is hard to photograph on this paper)

Step 5: Die cut 2 those little ovals twice. Use the pencil lines as a guide. The dies should be placed between the gift card edge line and the inner line on both the top and bottom edges of where the card will be. Make sure they are straight and parallel,

Step 6: Thread SMOOTH satin ribbon through the slots and attach the ends to form two loops (one ribbon loop for the top of the gift card, one for the bottom). Make sure whatever adhesive you use to glue the ends together is very strong. I like to use the Tim Holtz tiny attacher to staple my ribbons.
Test to make sure both ribbon loops slide smoothly. You will notice that where attached the ribbon ends together will get caught on the slots. That is fine. It will keep your slider from moving too far.

Step 7: Slide both ribbons so the ends of the ribbons are as far to the CENTER of the panel as possible. Flip your panel over and add a small amount of double sided tape to the ribbon on the OUTSIDE edge.
NOTE: choose a double sided tape that is strong enough to stick the card to the ribbon, but allows the recipient to easily pull the card out without having to tear apart the card.

Step 8: Adhere the gift card to the tape you just put on the ribbons. The card should be at or very near the outside edge of the card

Step 9: Flip the card over. Glue a 1/2" wide strip of cardstock to both ribbons where the ends of the ribbons are glued together. (they should still be pushed towards the center of the card, and the gift card on the front should be at the outside edge of the card). Die cut the pull tab, and cut off the arms so you just have a long strip of cardstock. Trim to desired length. Glue that to the cardstock strip.
TEST. When you pull the tab, both ribbons should move at the same time, and the card on the front should move in the opposite direction.

Step 10: Die cut the sleeve, fold and glue together. Adhere the sleeve to the back of the panel. Make sure your pull tab is going through it. This will keep your tab straight.

Step 11: Cover the back of the panel with foam tape and adhere to your card base. (Be careful not to place any tape in areas that would impede movement.)

Step 12: Add some foam adhesive to the top and bottom edge of your stamped panel. Make sure there is plenty of room for the card to move when it is placed on the card front. Adhere in place.

Step 13: Finish decorating your card as desired!
It sounds kind of complex, but it's actually pretty simple! And you completely WOW your friends!
Ok.. Let's take a look at the rest of the Ruby line...

Paper: LDRS Creative Sweet Sensations; Neenah Classic Crest Solar White
Coloring: Copic
Skin- E33, E35, E17, R14, E04
Hair- W5, E87, E79, E49
Yellow- YR30, YR31, Y28
White- N0, N2
Other: Hemptique hemp

This stunning Ruby is dressed to impress!

The sentient comes from the On the Move stamp set.

Aren't these new papers gorgeous?? And they are double sided!

Paper: LDRS Creative Homemade Happiness; Neenah Classic Crest Solar White; Recollections Glitter paper
Stamps: LDRS Creative Ruby Pretty Cute
Coloring: Copic
Skin- E30, E31, E33, RV42, E04
Hair- E53, E39, E29, E49
Green- YG03, YG93
Blue- BG000. BG01. FBG2, BG07
White- 0, N0, N3
Basket- E44
Yellow- Y17, Y38, YR27
Pink- R22
Purple- V04
Black- 100
Dies: LDRS Creative Ribbon Gift Frame and Bow
Stencil: LDRS Creative Waffle Cone

This Ruby is perfect for spring and summer! Check out her sweet dress and basket of flowers!

To create the background, I sponged some ink through the new Waffle Cone stencil. I kept the ink concentrated in the area Ruby would be standing, then faded out towards the edges.

I popped both the white panel and Ruby up with foam tape, so there's lots of fun dimension!
And that does it for Ruby (for now anyway). I'll be back tomorrow with MORE new stuff!
Hop along and leave a comment so you could win!
JANE
KASSI {you are here}
ALANNA
JEANNIE
ZSOFIA
MARTHA
MELISSA
ILINA
KIRSTEN
MELANIE
RALUCA
See you tomorrow!
~Kassi
For more inspiration, follow me on:
*Affiliate links used when possible. This doesn’t affect the price you pay, it simply allows me to continue bringing you better content. :)
How cute your girlies are. I really like your coloring. Mine is flat.
ReplyDeleteWhat beautiful cards and your coloring is amazing!!
ReplyDeleteanother collection of amazing cards - your work is gorgeous:)
ReplyDeleteThese girls are so cute! What beautiful cards!
ReplyDeleteAwesome cards! love the girls and your pretty coloring!
ReplyDeleteAMAZING coloring! And what a great idea for the gift card! SOOOO AWESOME!
ReplyDeleteThese are so darling! I love this release!
ReplyDeleteThis wwas great to read
ReplyDelete