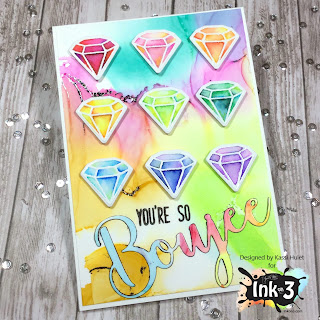
so boujee...
Ever since I was a kid, I loved diamonds... Not because of their value (I couldn't tell a real one from a glass one), but simply because they are sparkly and pretty. It made me feel sophisticated to have jewels in my necklace... Well as sophisticated as a 8 year old can feel....
As I got older, I learned that sparkly jewels come in ALL colors of the rainbow!
As I got older, I learned that sparkly jewels come in ALL colors of the rainbow!
Paper: Strathmore Bristol Smooth; Neenah Classic Crest Solar White; Yupo
Stamps: InkOn3 Bad & Boujee
Ink: InkOn3 Juicy Clear Embossing, Blackout
Coloring: Zig Clean Color Real Brush, Arteza Real Brush, Copic Various Ink
Red- 037, 080, 038, 030, 044
Pink- A192, A129, A187, A190, A183, A151
Orange- A128, A135, A112, A140
Yellow- 050, 051, 061, 023, 036
Light Green- A159, A111, A152, A151
Dark Green- A185, A132, A147, A159
Light Blue- 031, 032, 086, 045
Dark Blue- 037, 080, 038, 030, 044
Purple- A109, A125, A186, A165, A136, A162
Background- YR23, BG15, V05, YG05, RV14, V04, B01
Dies: InkOn3 Bad & Boujee
Other: InkOn3 Arctic White embossing powder; Minc silver foil
_____________
Ready to make a colorful gem card with me? Let's get started!
_____________
Ready to make a colorful gem card with me? Let's get started!
Step 1: Stamp a bunch of jewels using Juicy Clear Embossing ink, then heat emboss using Arctic White embossing powder. I ended up using 9 gems for my card, but I embossed a few extra just to be on the safe side.
Step 2: Add color! I love the fire scintillation in gems (the flashes of different colors you see when light hits it), so I tried to incorporate more than one color into each gem...
(no, I'm no diamond expert... I had to look up the technical term for the pretty rainbow sparkles... LOL!)
Step 3: When you gems are finished, use the coordinating die to cut them out.
Step 4: On Yupo paper, create an alcohol ink background using your favorite techniques and inks.. Make your piece big enough to cover your card front plus die cut our sentiment...
You can watch my basic technique HERE, the only thing I did differently from the video, is I pressed some Minc foil over the the background while some of the ink was still a bit tacky so there are silver veins going through the background.
Step 5: Die cut the word 'Boujee' from the colored Yupo. To help make the word pop from the background, run the edge of a black alcohol marker along the edge.. this will give it a very subtle black outline.
Step 6: Trim the remaining yupo background to about 1/4 inch smaller than your card base.
Step 7: Adhere the yupo background to your card base. Stamp "You're so" using Blackout ink and carefully heat set (don't overheat your yupo, or it will warp). Adhere 'Boujee' to the card base.
Step 8: Adhere your gems using foam tape.
This card is so bright and colorful! Having the gems popped up gives it great dimension, and the veins of silver really pull it together!
I'm still partial to diamonds, but it is so fun looking at all the different colors and learning about the different types of gems!
What is your favorite gem stone?
See you soon!
~Kassi
~Kassi
For more inspiration, follow me on:
*Affiliate links used when possible. This doesn’t affect the price you pay, it simply allows me to continue bringing you better content. :)


Comments
Post a Comment